STL Editor
Scale, Cut and Split Models to Fit Your Printer
This STL editor changes a file the way a print needs it, not the way a modelling program does.
Drop one model or several onto a virtual build plate, type the exact size in millimetres, turn it, mirror it and lay it flat, then cut it into closed halves or split it into the separate bodies it contains. Choose a 180, 220, 256 or 350 mm plate or enter your own build volume: anything too large is drawn in red, and Split to fit my bed works out how many equal pieces, or what scale, would make it print. When the STL editor cuts, it can add alignment pegs or dowel holes, and each half is capped so it stays a watertight solid. A model saved in centimetres, inches or metres is corrected with one click. When you are done, the online STL editor saves binary STL, a 3MF with separate objects, OBJ, or a ZIP with one STL per part. It is a free STL file editor with no sign-up: you use the STL editor online, but it runs in your browser, so the file never leaves your computer.
Open a sample in the STL editor
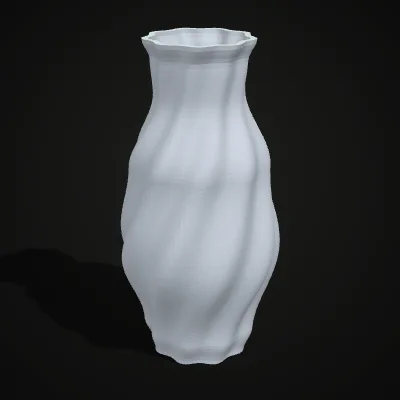
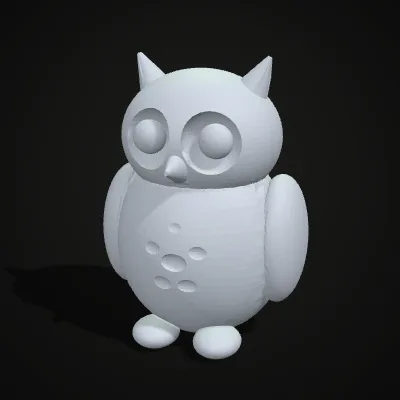
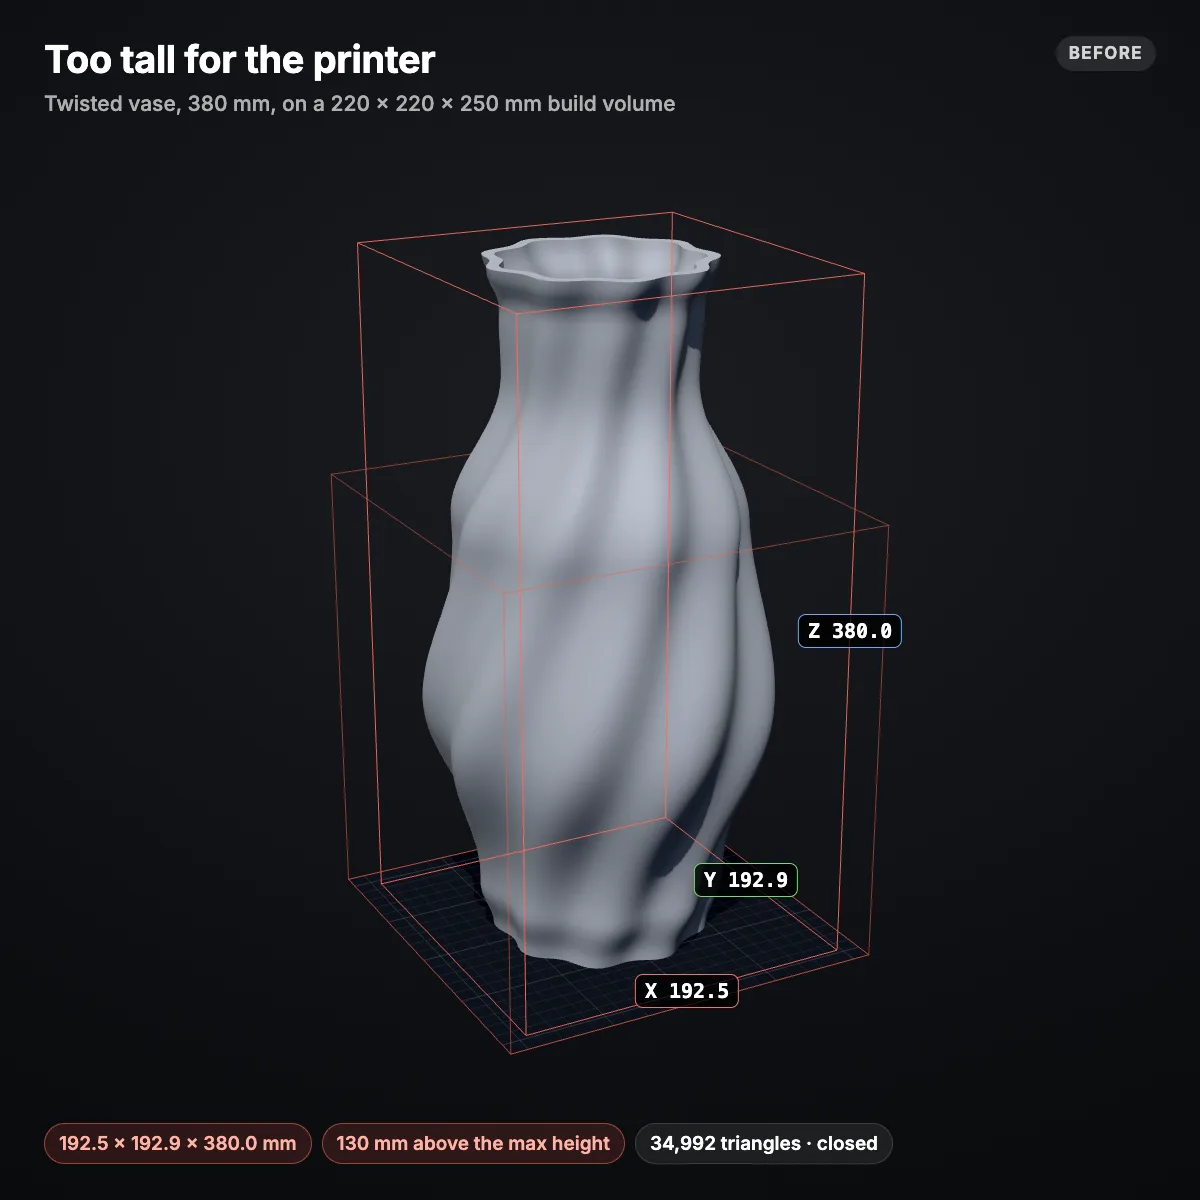
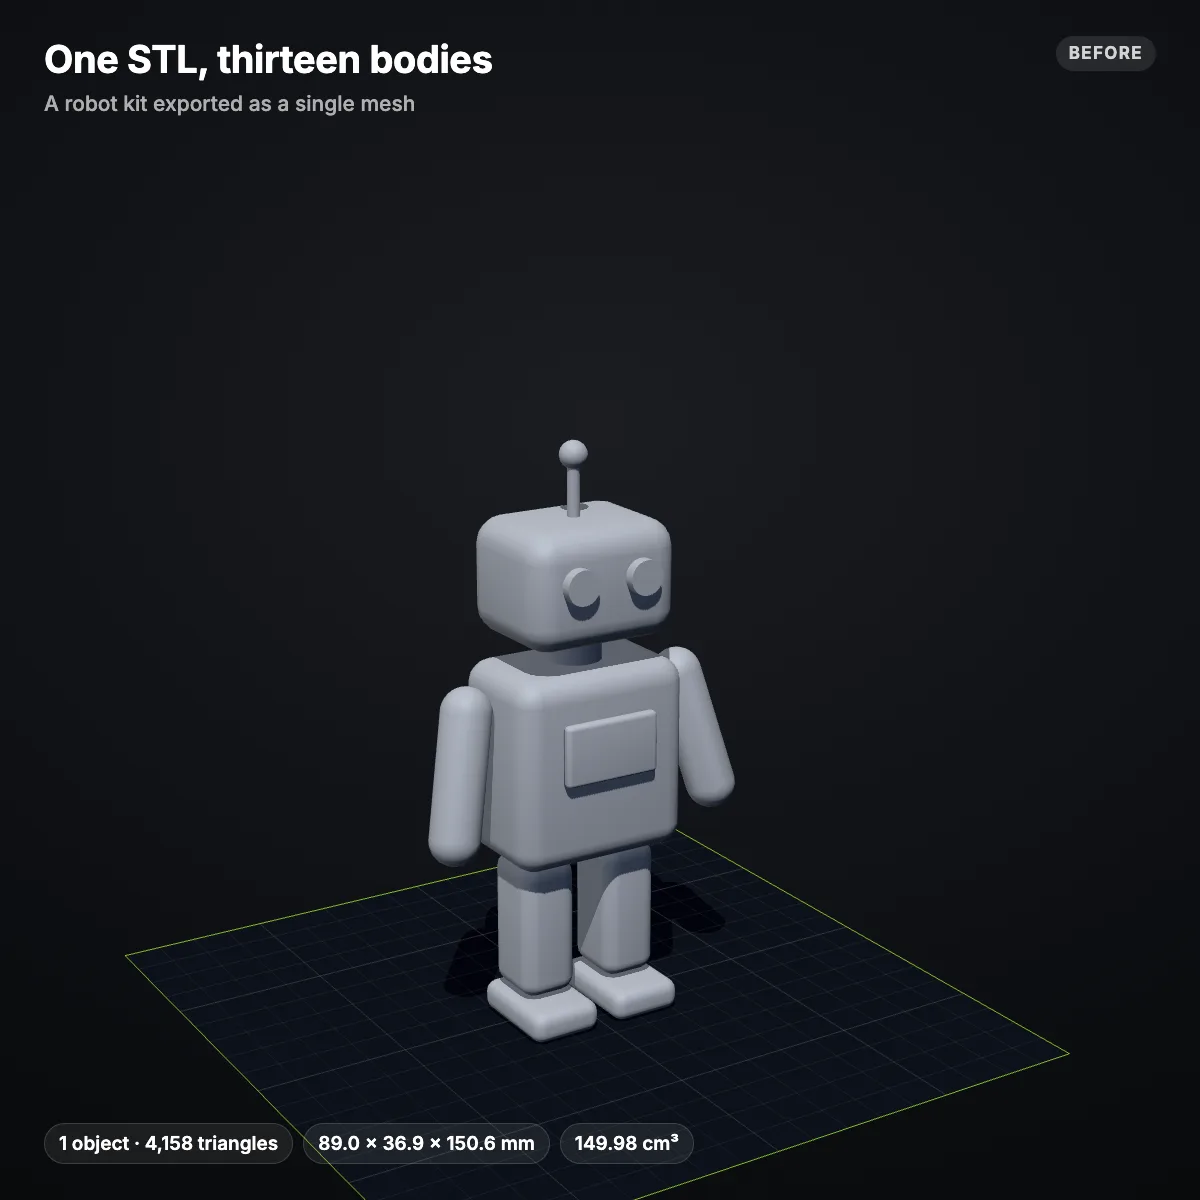
Each sample calls for a different edit: a vase that is 130 mm too tall for a 250 mm high build volume, a robot kit exported as one mesh with 13 bodies inside, and a smooth owl to resize to any height. Click Try to load one into the STL editor, or download it and look at it in your slicer first.

STL editor demo: scale, cut with pegs, save a 3MF in 18 s
The recording drops the vase sample on the 220 mm plate and scales it to 110 %, which makes it 211.8 × 212.2 × 418.0 mm. On the Cut tab the connectors switch to Pegs at Ø 3 mm, and the cut at Z = 209.0 mm returns two closed parts joined by four pegs and their holes. The Export tab of the STL editor then writes both halves, each as its own object, into one 455 KB 3MF for the slicer.
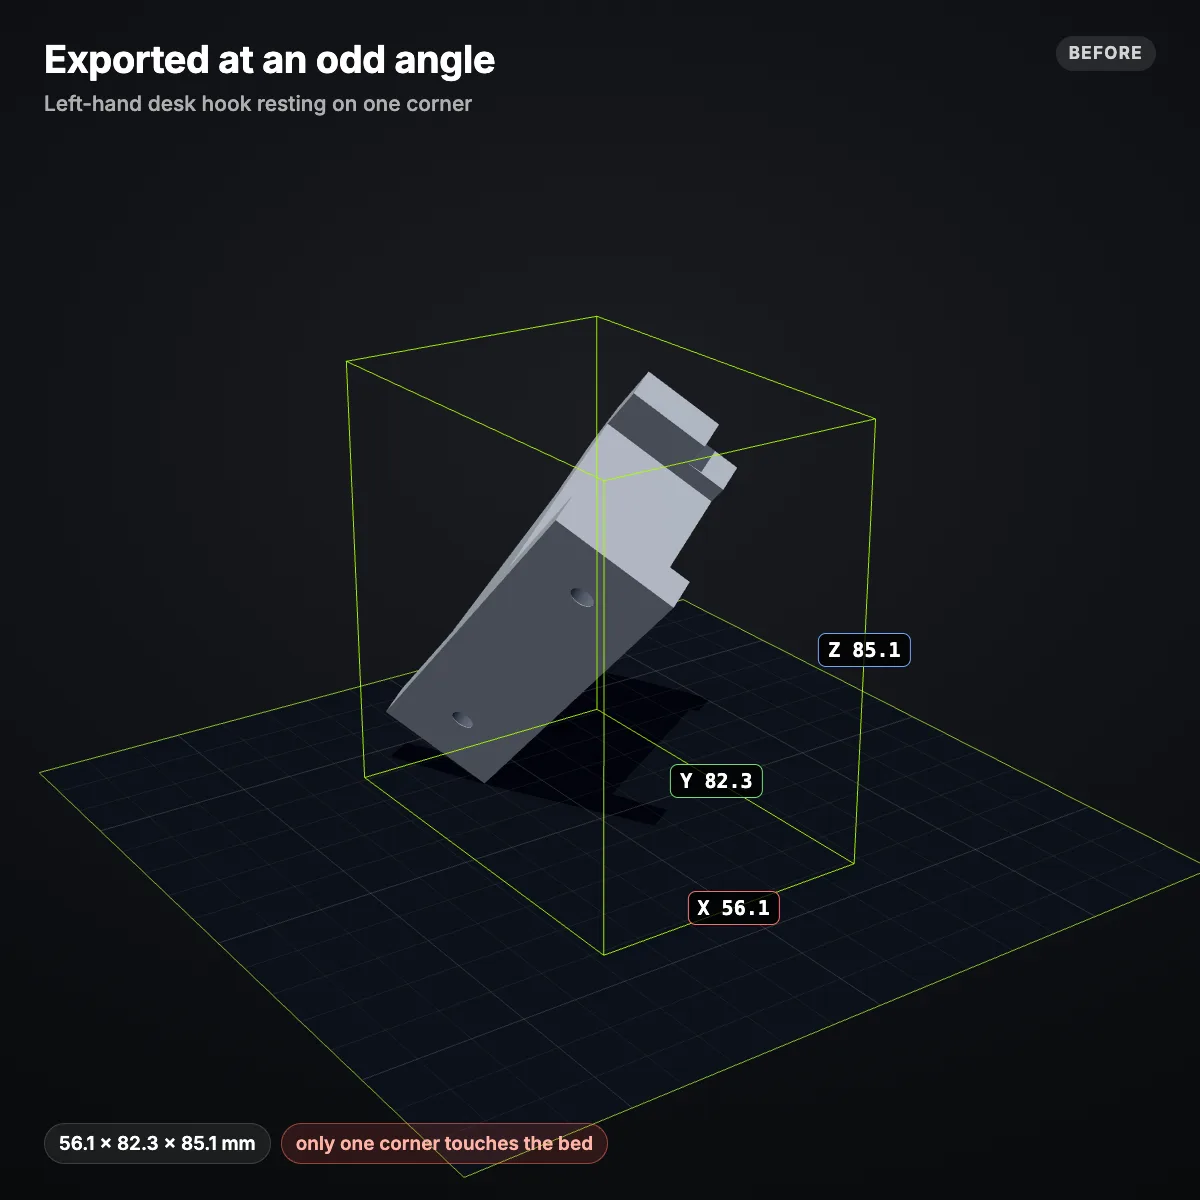
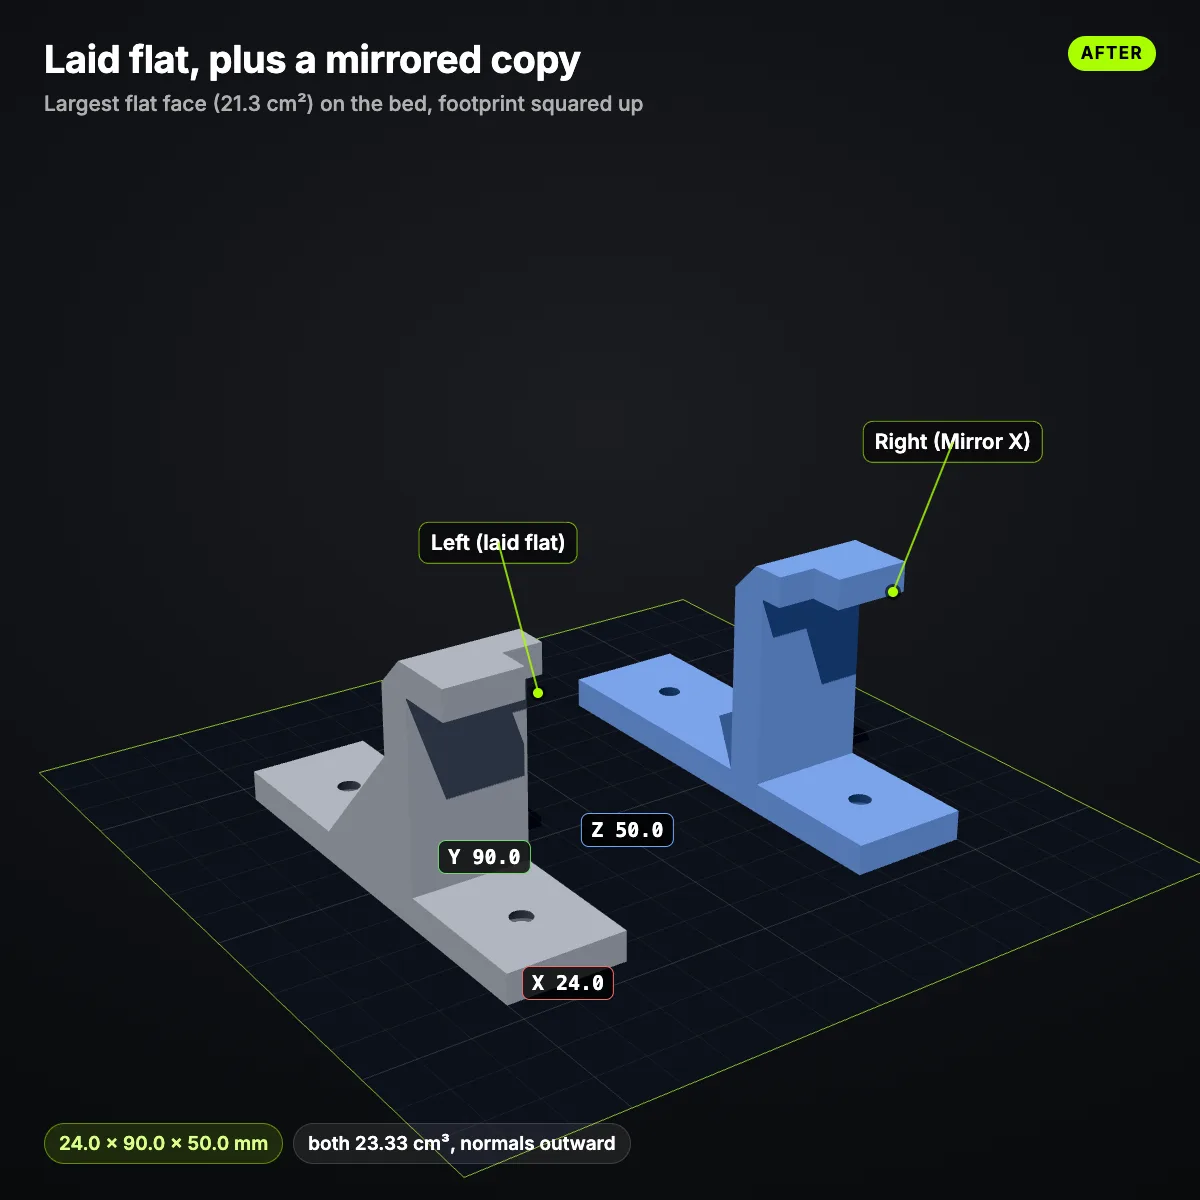
Before and after: four jobs done in the STL editor
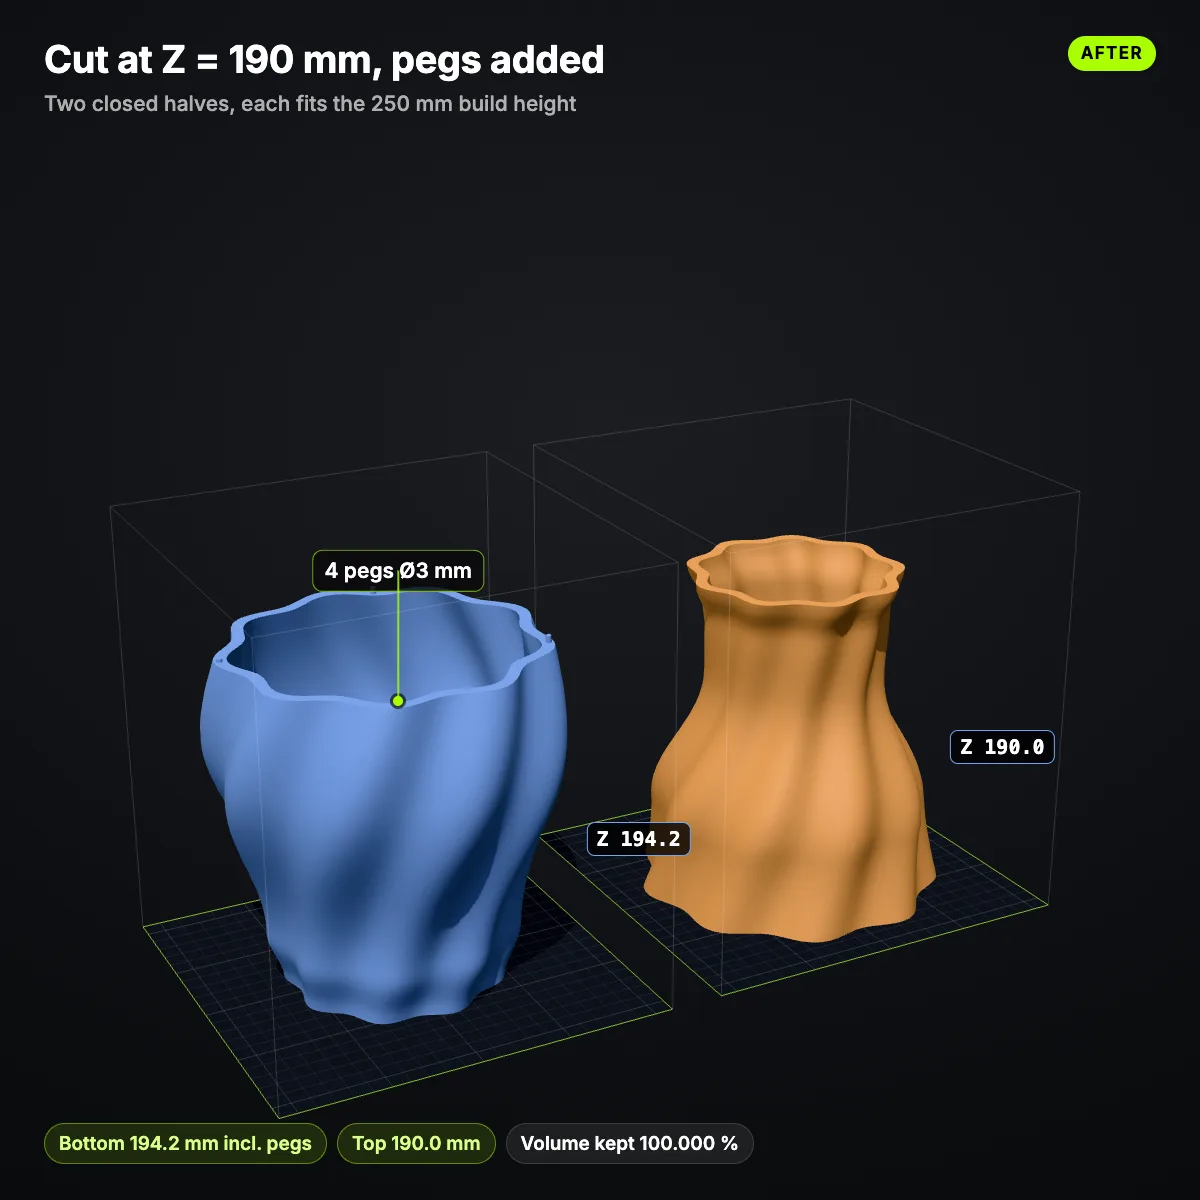
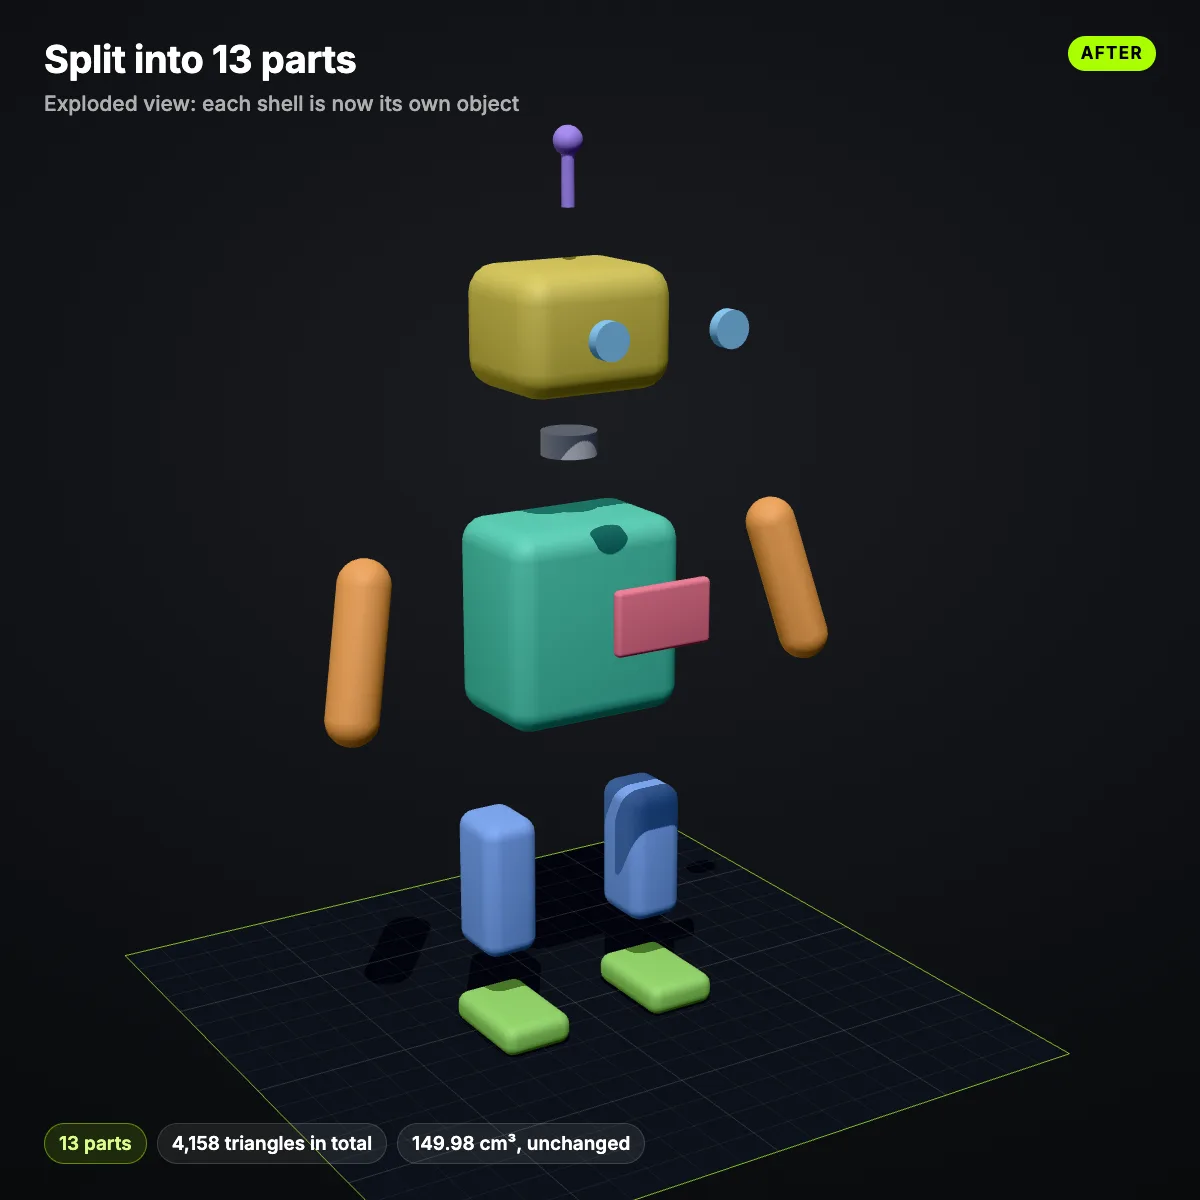
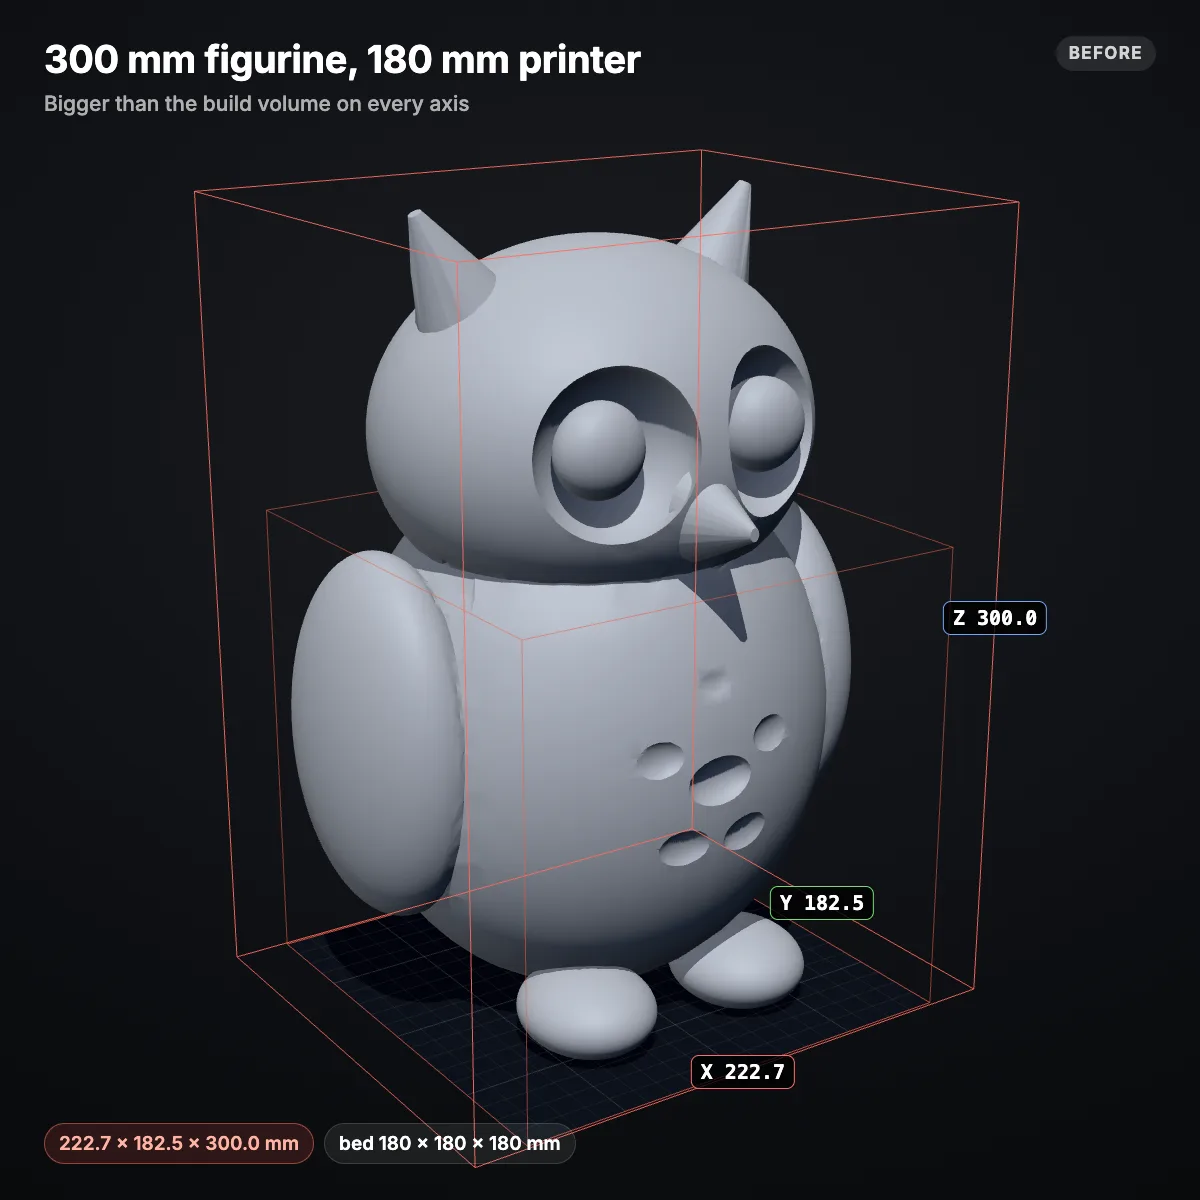
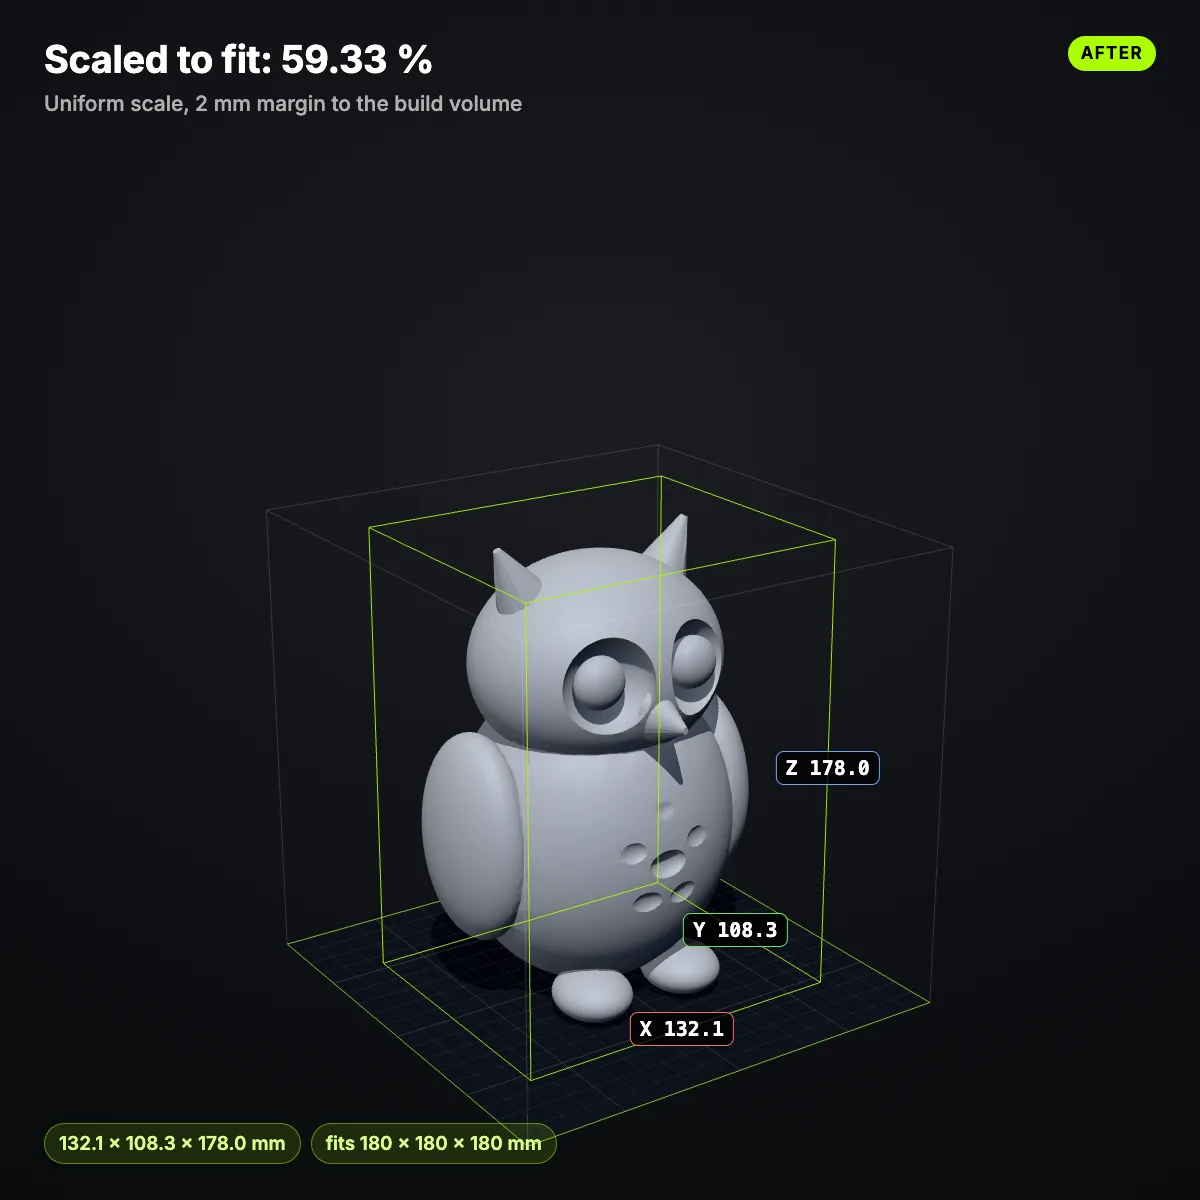
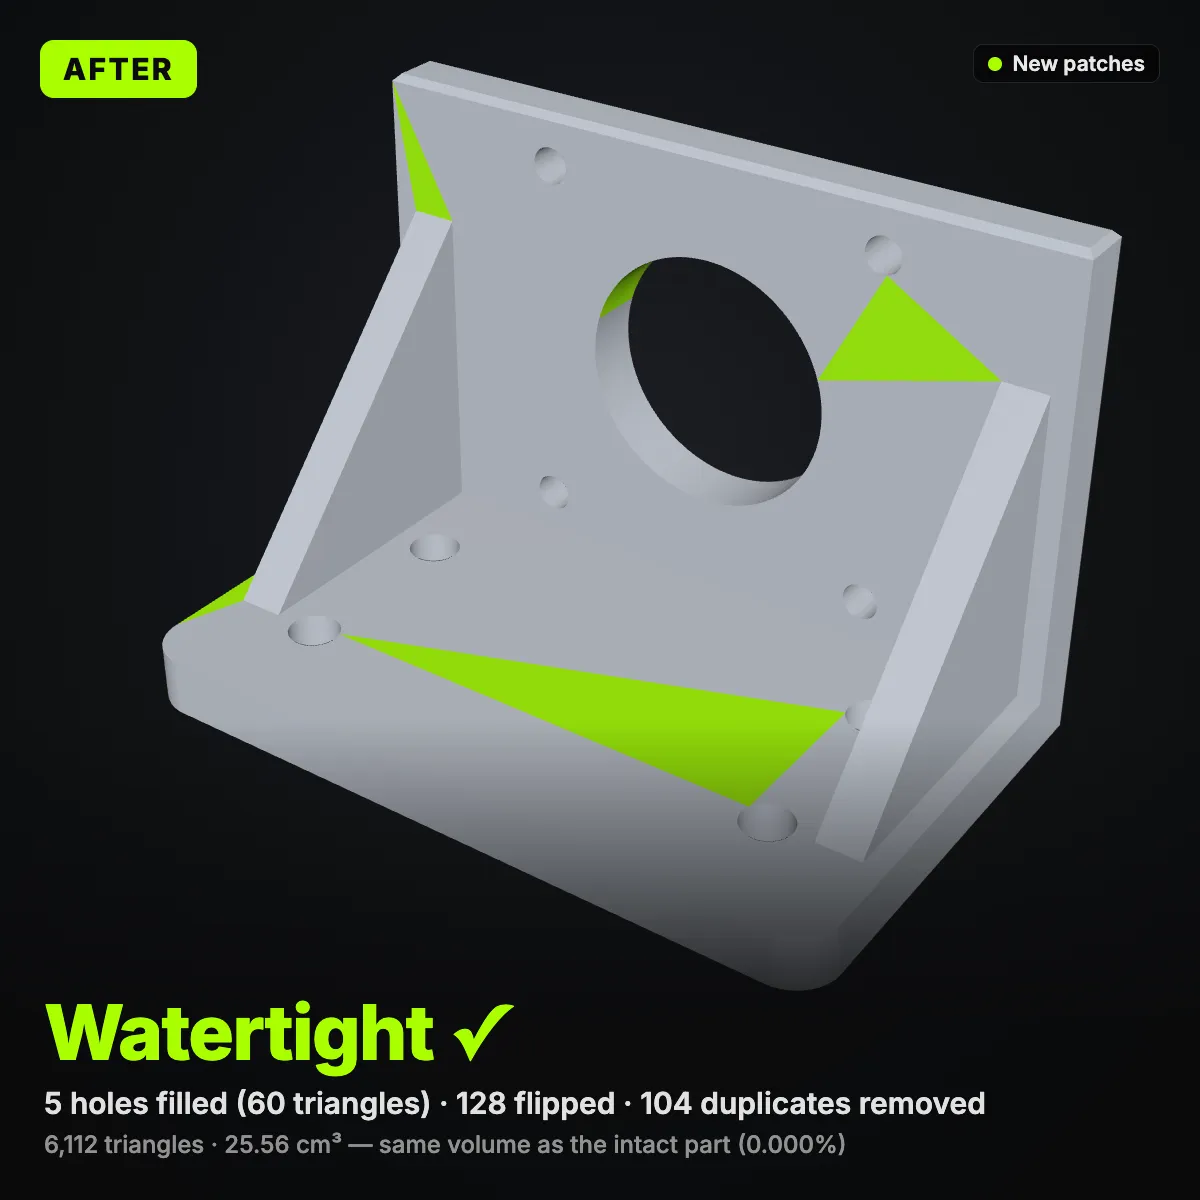
Four models, each rendered from the same camera before and after a single job in this STL editor, with the build volume drawn as a box. Sizes, triangle counts and volumes are computed by the tool’s own code, and every cut part was checked to be a closed solid.
Inside the STL editor: screenshots and measurements
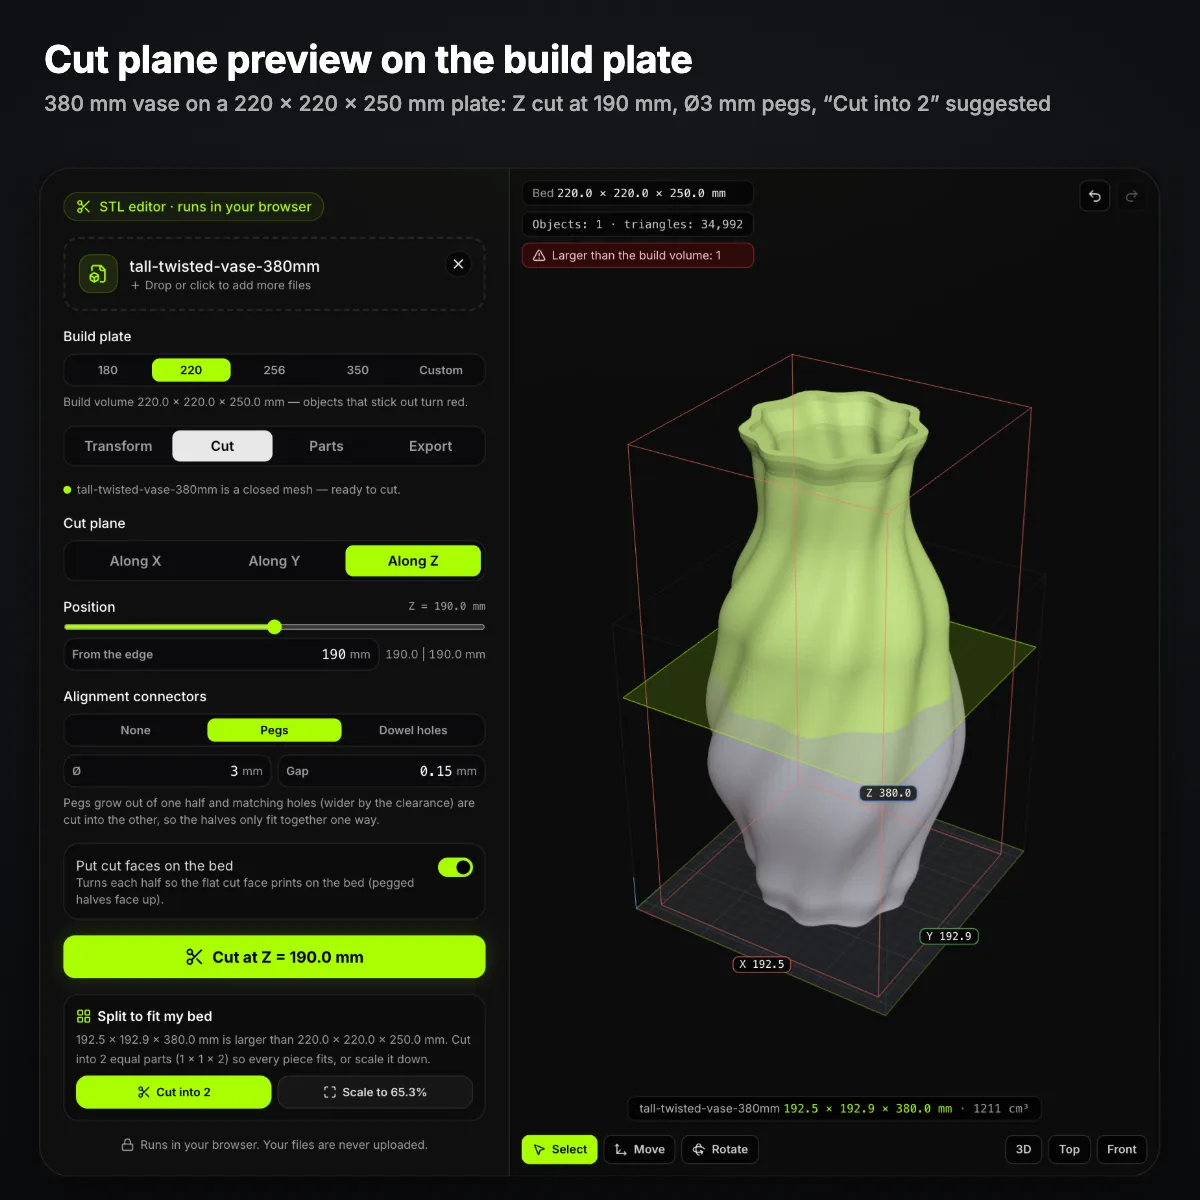
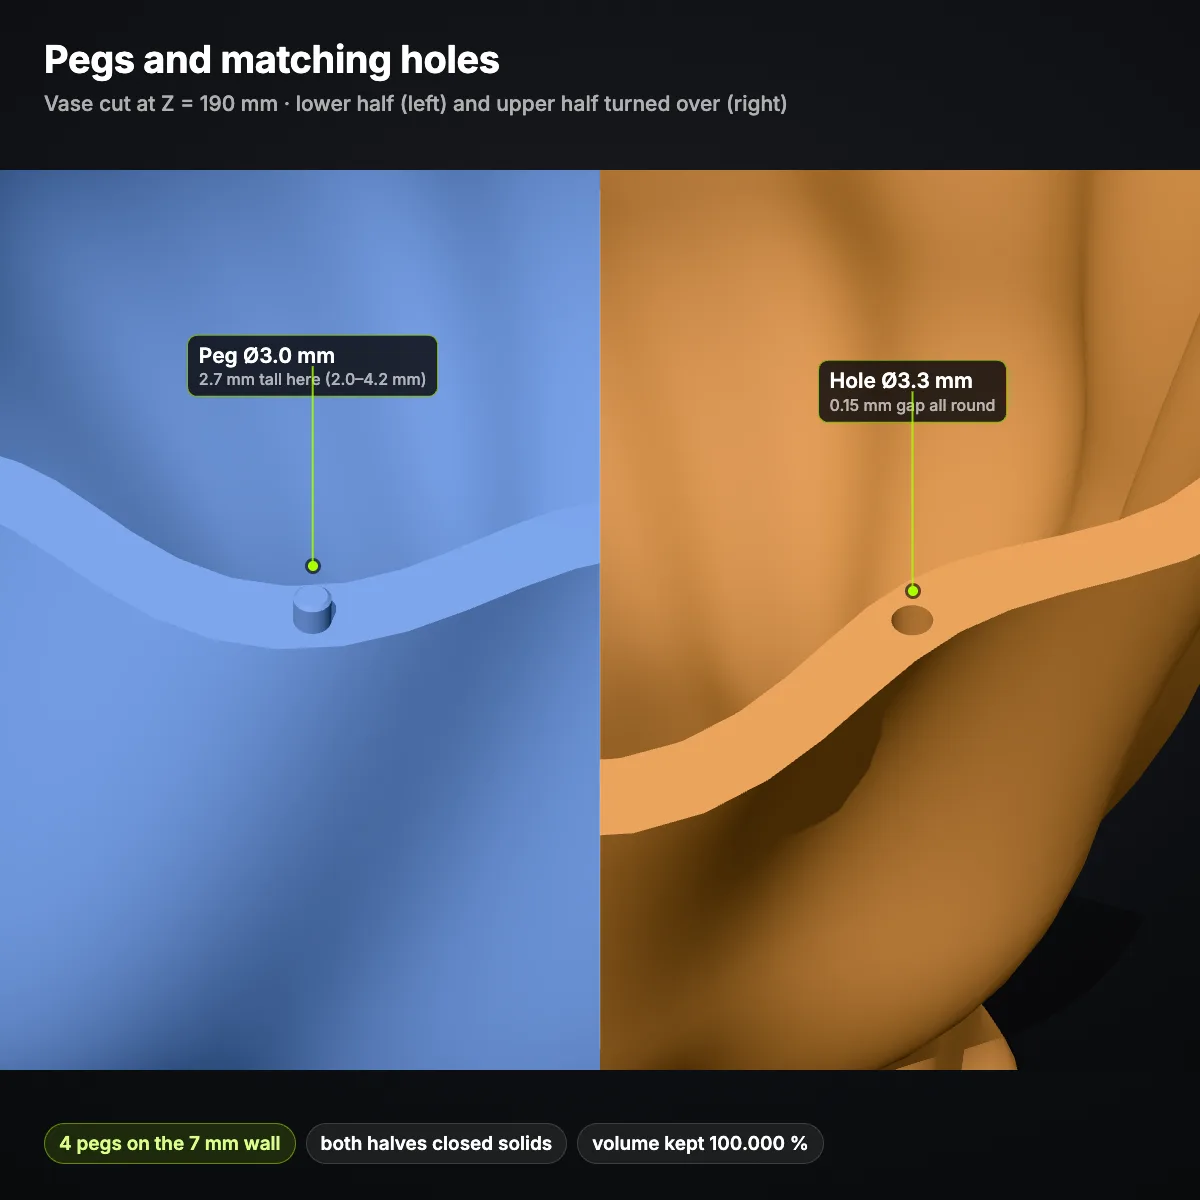
Eight images from real sessions with the STL editor on the samples above: three screenshots of the tool, a close-up of the pegs it cuts, labelled exploded views, a size sequence and a chart of export sizes.

How to use the STL editor: scale, orient, cut, export
- 11
Load files into the STL editor
Drop one STL or several at once; OBJ, 3MF, GLB, PLY and STEP open too, up to 200 MB each, and GLB, glTF and USDZ are converted from metres to millimetres. Pick the build plate first (180, 220, 256, 350 mm or Custom) so the STL editor can mark anything too large in red.
- 22
Scale STL to the size you need
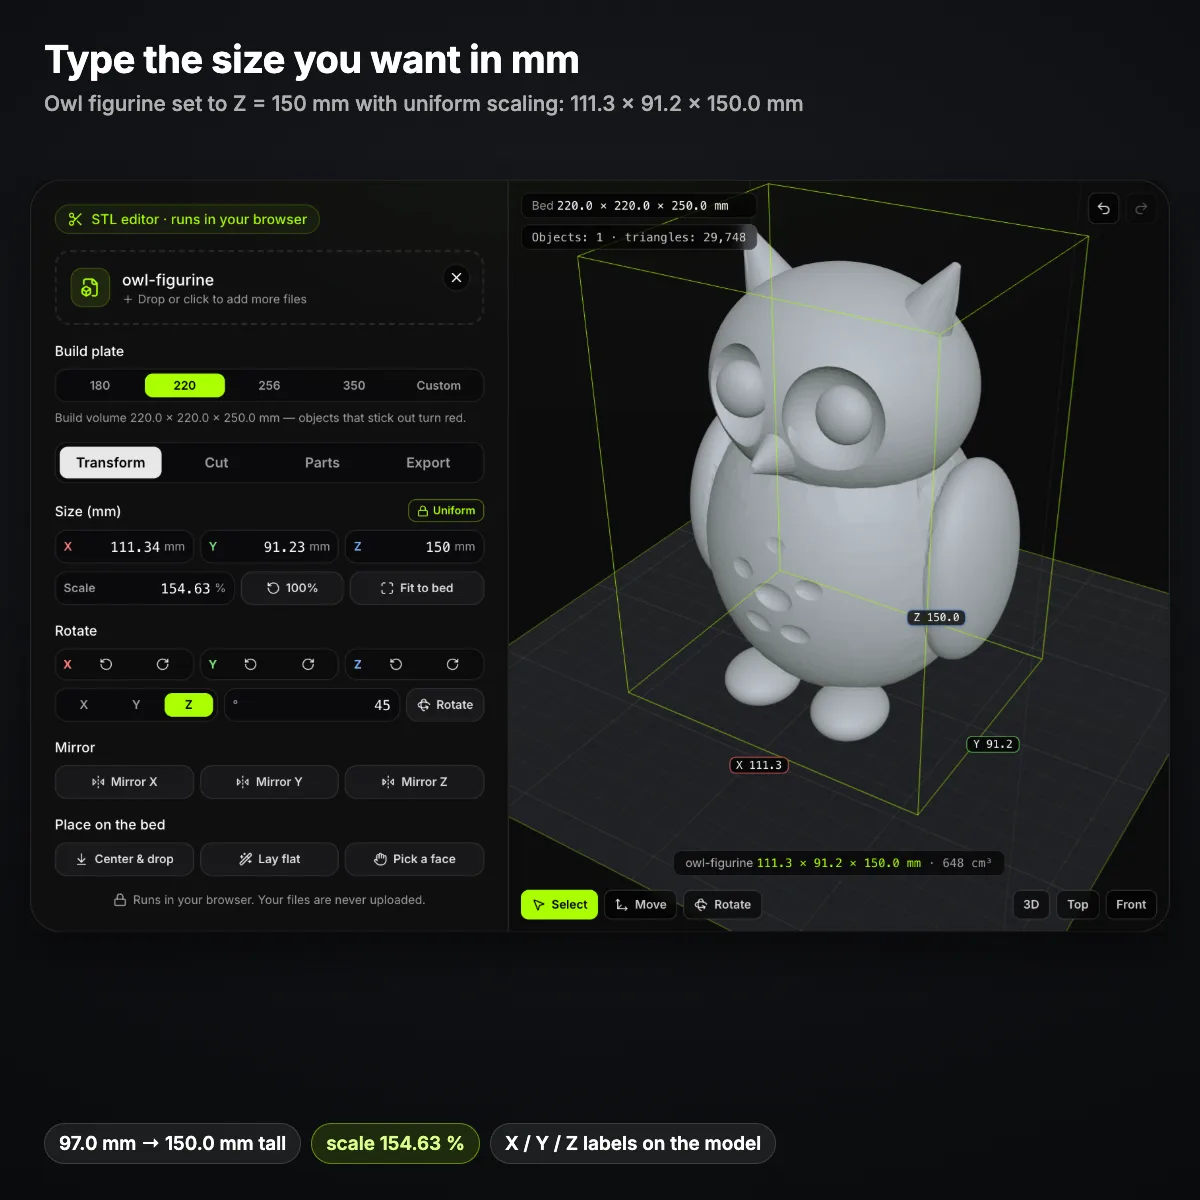
Type a length in mm into X, Y or Z. With Uniform on, the other two axes follow; switch to Per axis to stretch one direction only. Scale %, 100 % and Fit to bed sit right below, and a model under 5 mm across gets cm → mm, inch → mm and m → mm buttons.
- 33
Orient it for printing
Rotate ±90° around any axis, type an angle, or drag the rotate gizmo in the view, which snaps in 5° steps; the move gizmo slides objects around the plate. Lay flat puts the largest flat face down, Pick a face lets you click the one you want, Mirror makes a left or right version, and Center & drop returns the model to the middle at Z = 0.
- 44
Cut STL or split it into parts
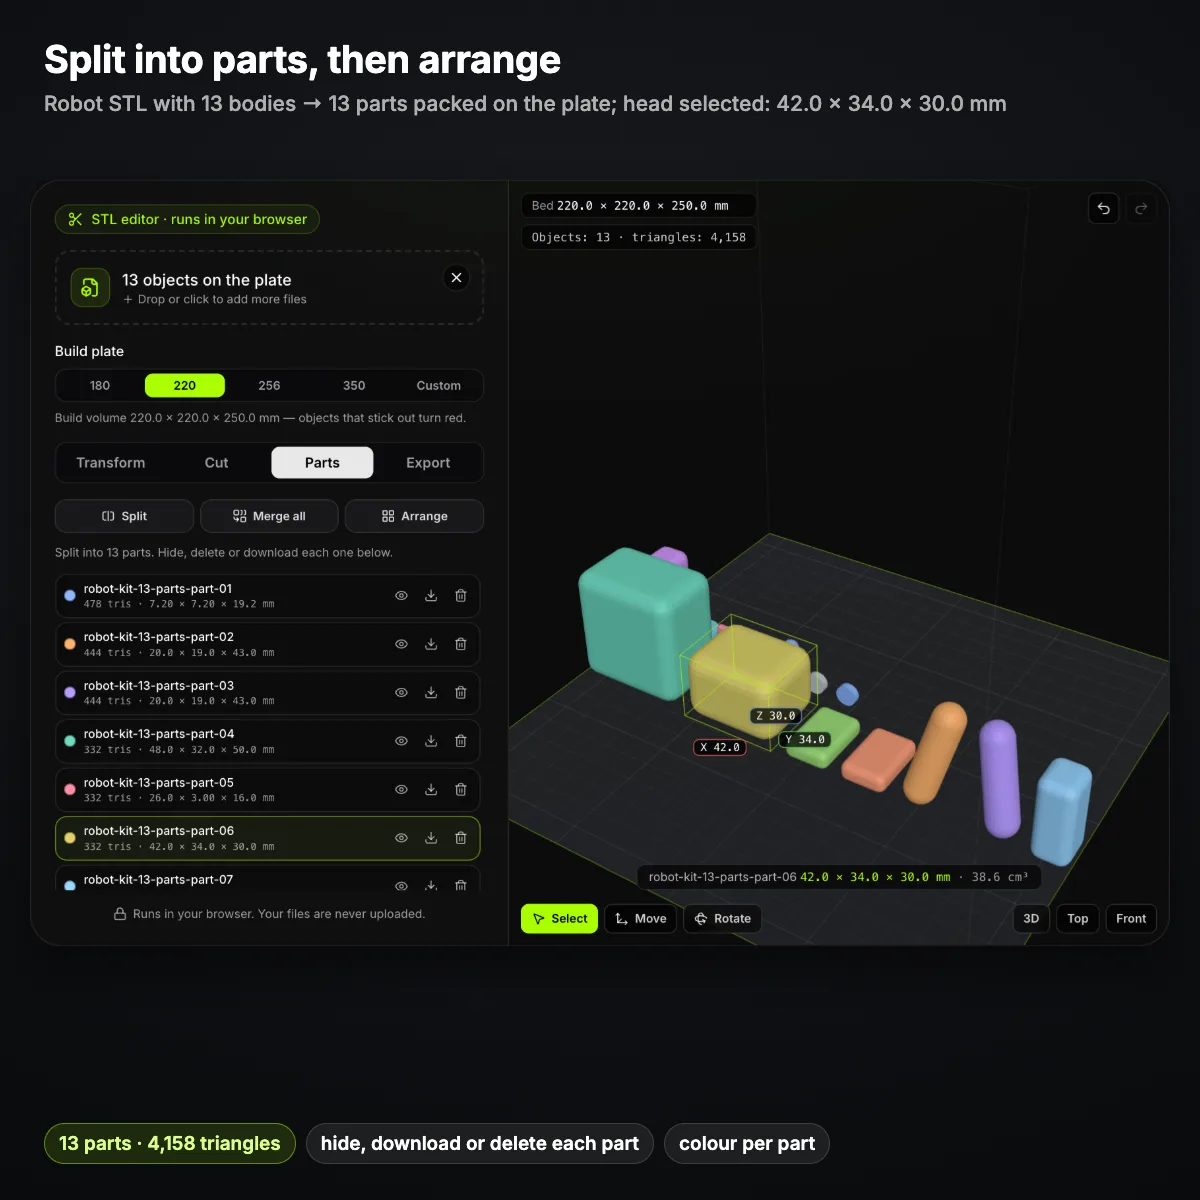
On the Cut tab, choose X, Y or Z, drag the slider or type the distance from the edge, choose None, Pegs or Dowel holes, and press Cut. Oversize models get a Split to fit my bed card. On the Parts tab, Split separates the bodies of a mesh, each with Hide, Delete and its own STL download, next to Merge all and Arrange.
- 55
Check and export
The Export tab lists objects, triangles, print volume, overall size and whether everything fits the plate. Download one binary STL with every visible object, a 3MF that keeps them apart, an OBJ with named groups, or a ZIP with one STL each. Ctrl+Z undoes up to 40 steps if something went wrong.
Common STL edits and where to find them
What people most often need to change in an STL file, the control that does it in this STL editor, and a tip from testing the samples. All of it moves, resizes or divides the triangles; none of it redesigns the part.
| Edit | In the STL editor | Tip |
|---|---|---|
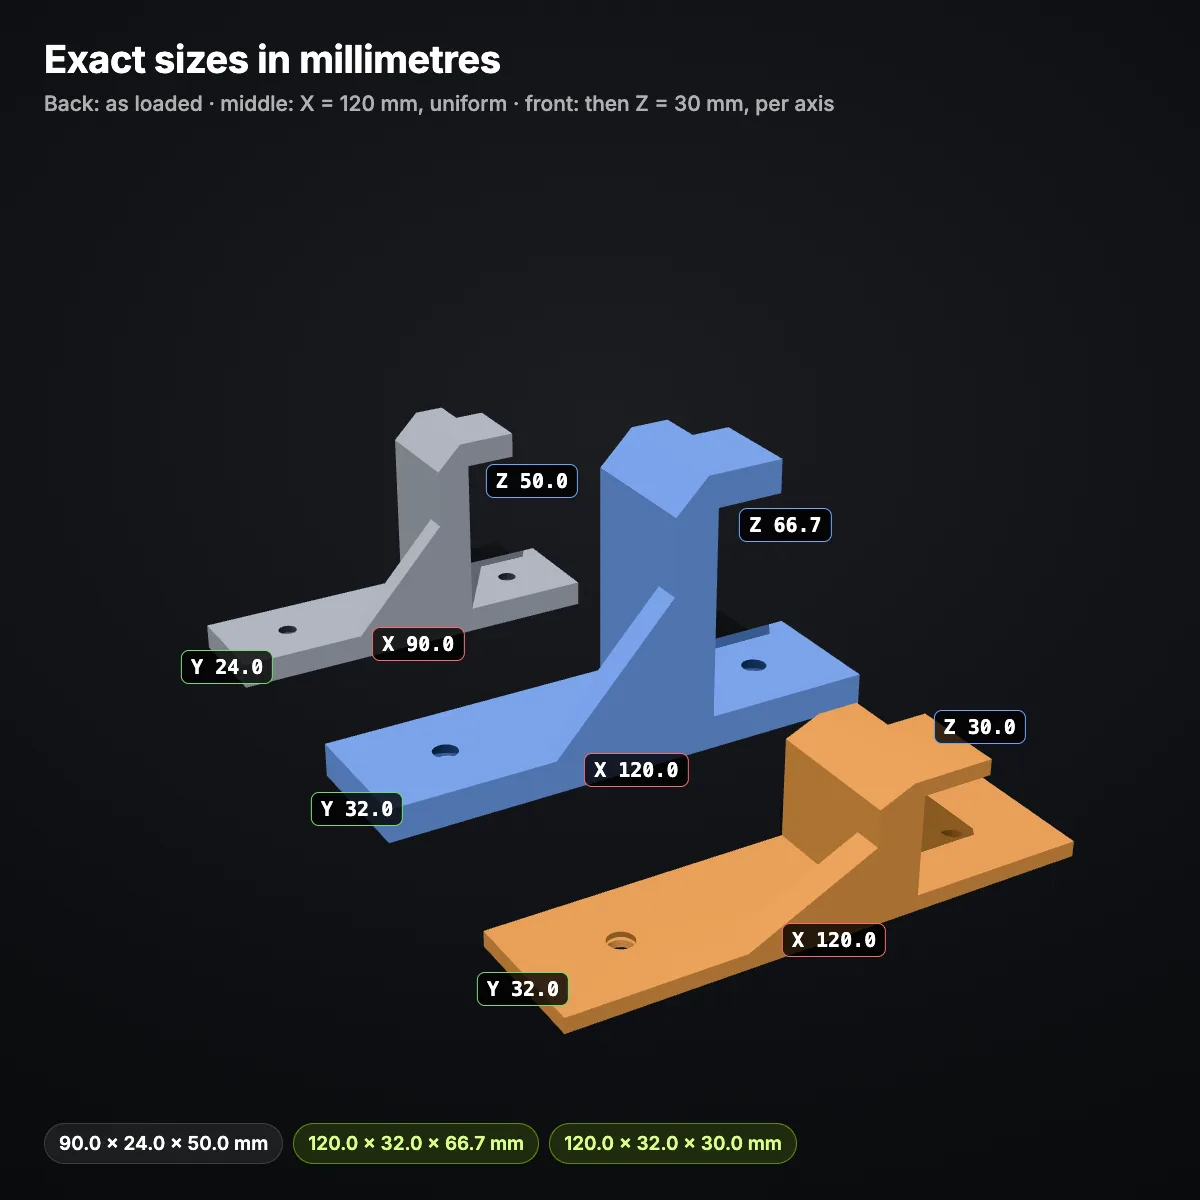
| Resize STL to an exact size | Transform → Size (mm), Uniform on, type one side | Scale by the dimension that has to fit. The owl set to Z = 150 mm became 111.3 × 91.2 × 150.0 mm, and a 120 mm side read back from the saved STL as 120.00000 mm. |
| Scale by percent or to the bed | Scale %, 100 % to go back, Fit to bed | Fit to bed keeps 2 mm free on each axis of the chosen plate, so the 300 mm owl landed at 178.0 mm on a 180 mm cube. |
| Fix wrong units | cm → mm, inch → mm, m → mm (offered when a model is under 5 mm across) | A part meant to be 50 mm that shows up as 1.97 mm was saved in inches: inch → mm multiplies by 25.4. |
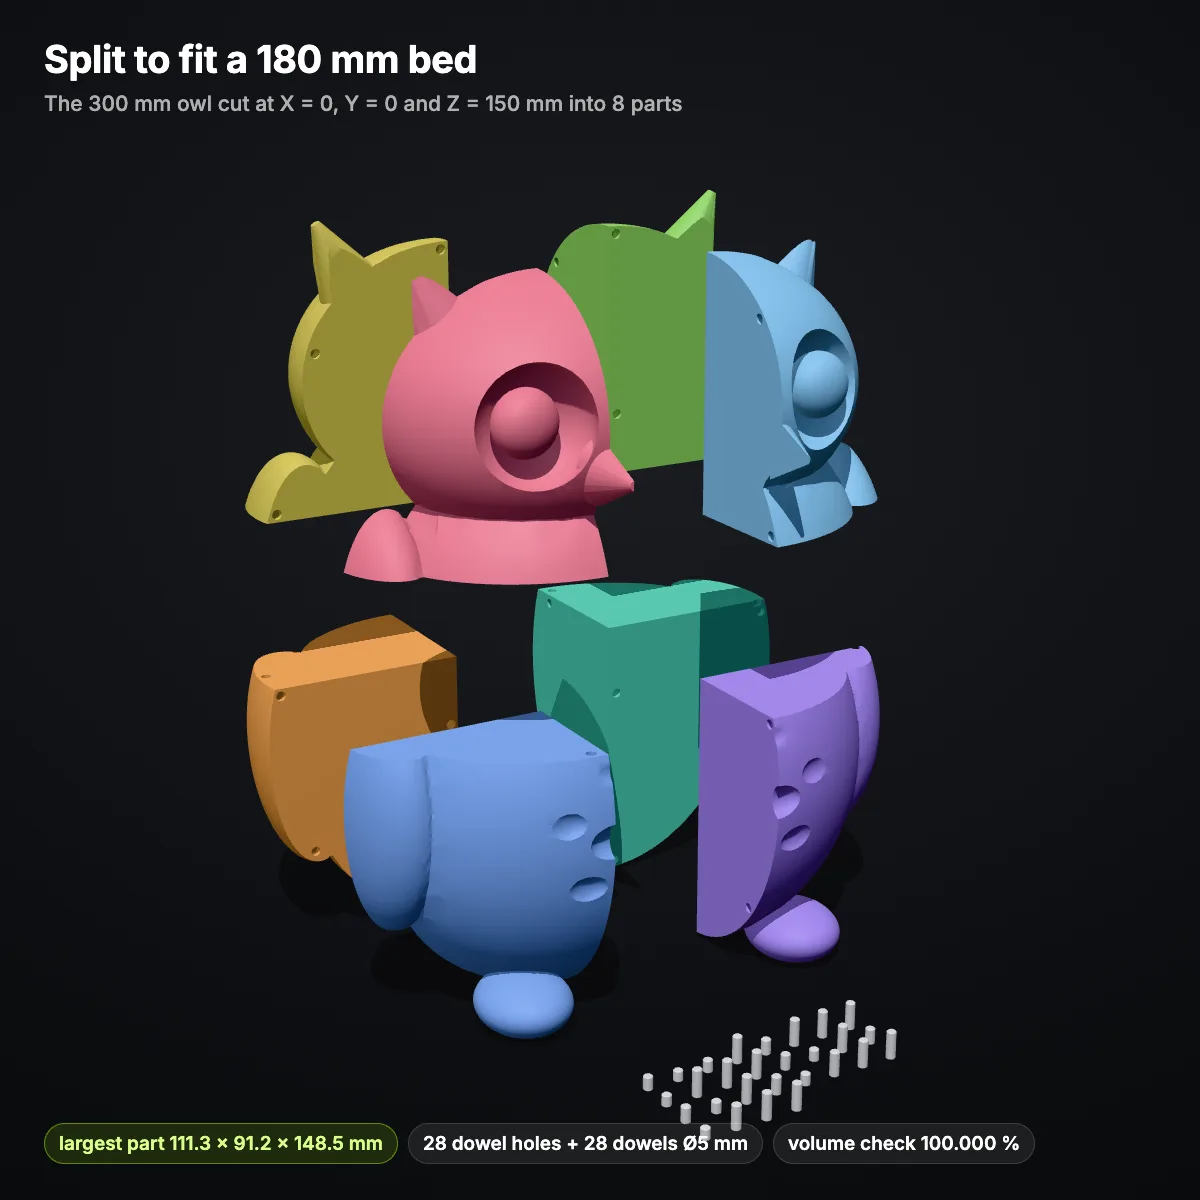
| Cut a model that is too big | Cut → Split to fit my bed: equal pieces along X, Y and Z, or the scale that fits | The 380 mm vase needs 2 pieces for a 250 mm high printer, the 300 mm owl 8 pieces for a 180 mm cube. For a less visible seam, place the cut yourself, for example under a rim. |
| Add pegs | Connectors → Pegs, Ø 1.5–20 mm (5 mm default), gap 0–1 mm (0.15 mm default) | Pegs grow from the lower half; the hole above is wider by the gap on each side and 0.3 mm deeper than the peg. On the 7 mm vase wall, 5 mm pegs found no room and 3 mm pegs fitted four. |
| Use dowel holes | Connectors → Dowel holes | Both halves get holes and loose chamfered pins are added as extra parts. Set Ø 1.75 mm to use a piece of filament as the pin, or the diameter of the wooden or metal pins you have. |
| Split into separate parts | Parts → Split, then Hide, Delete or download each part | Only bodies that share no vertices come apart. A fused mesh stays one part, so cut it instead. |
| Mirror a left or right part | Mirror X, Y or Z | The triangle order is flipped back after mirroring, so normals still face out and the volume stays the same. |
| Lay flat on the bed | Lay flat (largest flat face) or Pick a face | The largest face gives the most contact. When looks matter more, click a face that will be hidden. |
| Change the design itself | Not in an STL editor: hole sizes, text, fillets and sculpting need the source model | Edit the CAD or Blender file and export a new STL; an STL holds triangles only, with no dimensions or history. |
What people use an STL editor for
Print a big model on a small printer
A tall vase, a helmet or a cosplay prop is often larger than the build volume. Choose your plate, let the STL editor suggest the pieces with Split to fit my bed, add pegs or dowels so they line up, and print each piece on its own. The 380 mm vase sample needs one cut for a 250 mm high machine.
Resize a downloaded model
Files from model libraries arrive at whatever size the designer chose. Type the height or width you need into the STL file editor instead of guessing a percentage, check the label on each axis, and the STL you save is exactly that size, so a figure, a box or a holder comes out right the first time.
Split a kit into separate parts
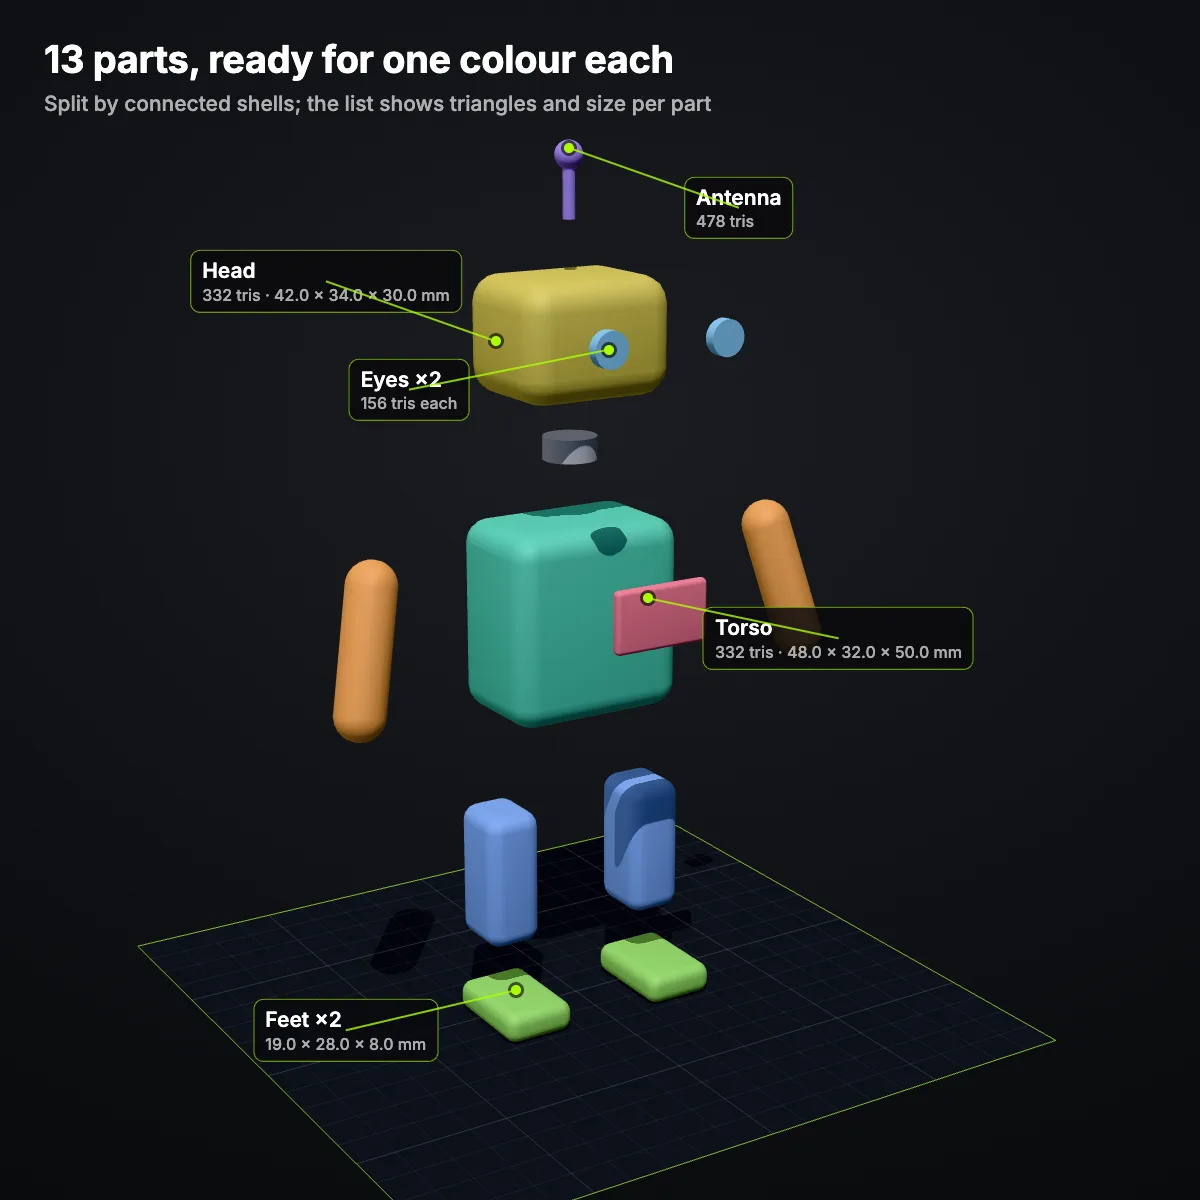
Kits and multi-part figures are often exported as one STL. Split in the STL editor separates every body, so you can delete spares, print pieces in different colours, or save a 3MF with each part as an object and a ZIP with one STL per part for separate plates.
Fix orientation before slicing
Models exported from other apps can arrive lying on their side, upside down or tilted. Rotate in 90° steps, lay the largest flat face on the bed, or click the face you want down; Center & drop then puts it back in the middle of the plate.
Make the mirror-image part
Brackets, hooks and shoe or glove parts often come in only one hand. Mirror X gives the opposite hand with the triangle order corrected, so the faces still point outward, and both versions can share one plate and one 3MF.
Know when you need CAD instead
An STL editor works on the finished mesh. Changing a hole diameter, adding text, sculpting detail or fusing overlapping parts needs the source model or Blender (Merge all only puts parts into one object). Broken files with holes go to STL Repair first.
STL editor FAQ
Open it in an STL editor that works on the mesh itself. Here you drop the file, change its size, rotation, mirroring or orientation on the Transform tab, cut it or split it on the Cut and Parts tabs, and download a new STL. To change the design (a hole size, added text), edit the original CAD or Blender file and export again; the guide on how to edit STL files compares those routes.
Yes. This online STL editor is free, needs no account and runs in your browser: the geometry is computed on your own computer with three.js and manifold-3d, and nothing is uploaded. Files can be up to 200 MB each. Cuts run on the page’s main thread, so a mesh with more than about a million triangles may pause the page for a few seconds.
In the STL editor, select the model and press Split on the Parts tab: every separate body becomes its own object that you can hide, delete or download, and inner walls of hollow parts stay attached. The robot sample becomes 13 parts with the same 4,158 triangles. If the model is one solid piece, Split says so; divide it with a cut along a plane, or Split to fit my bed for an even grid.
To resize STL files to an exact size, type the target length into X, Y or Z under Size (mm) in the STL editor. With Uniform on, the other axes scale by the same factor: the 97 mm owl set to Z = 150 mm becomes 111.3 × 91.2 × 150.0 mm (154.63 %). Switch to Per axis to change one side only. If the model shows up tiny, it was probably saved in inches or centimetres; use the unit buttons first.
To cut STL files in the STL editor, open the Cut tab, choose the axis, set the position with the slider or the From the edge field, pick a connector, and press Cut. Each half is capped where it was cut, so both stay solid. Leave Put cut faces on the bed switched on and each half is turned so its flat face prints on the plate; the pegged half is turned the other way so its pegs point up.
Usually because the mesh is not closed. A cut has to cap each half, which only works on a watertight mesh, so when the STL editor finds open or shared edges it shows how many and links to STL Repair. Repair the file there, load the fixed STL and cut again. If the message says the plane does not cross the model, move the plane inside the object.



No model to edit yet?
Describe an object or upload a photo and Ship3D’s AI generator builds a 3D model for you. Download it as STL and bring it back to the STL editor to size it and split it for your printer.
Free to sign up, no credit card required. Try it once for free.